Short Courses - Customised to Suit Your Needs
Select a short course from this list:
OR Download Short Course PDF HERE
Each course listed below has an estimated length (in hours). We recommend that no more than 3 people from your worksite attend the course together - each with their own laptop. More than this and problems with different learning rates and needs may interfere with your own learning. This, of course, is negotiable.
 Data Management
3 Hours
Topics Covered:
Select a topic from the list above to read more about that Excel Data Management feature.
Topics include:
- Auto Filters
- Advanced Filters
- Sorting, including multi-column and custom
- Freezing titles
- Named Ranges
- Linking and consolidating data
- Sub-totalling
- Data validation
- Pivot tables
Auto Filter
Filter a data table to see only specific data.
Example: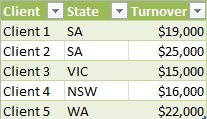
If your table had a column with the heading 'State' and you only wished to see those clients whose business was in 'SA' then you could select SA and see only those clients. All other rows are hidden from view. 
You can have more than one filter operating at a time. So, in addition to filtering for clients who are in 'SA' you can limit the list to only those who have a 'Turnover' of >$20,000. 
Thus the table is now filtered for those clients who live in SA AND whose Turnover is >$20,000.
Advanced Filter
In Auto Filtering (explained elsewhere), you can choose more than one criterion BUT the filtered list gets smaller with each criterion selected.
Explanation:
In the Auto Filer example (explained elsewhere) You can filter the table so it filters for those clients who live in SA AND whose Turnover is >$20,000.
However, there may be times when you want to see those clients who live in SA OR whose Turnover is >$20,000.
That is when you would use an Advanced Filter.
Simple Sorting
This occurs in a table or list when there is onle one column you need sorted.
Example:
Your table has a column with the heading 'State' and you only wished to sort by State.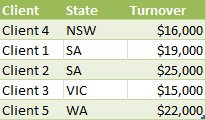
You can sort from A-Z (alphabetic order - as seen above) or Z-A (reverse alphabetic order - as seen below).
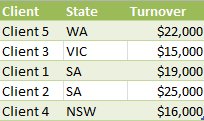
Complex Sorting
This occurs when you wish to sort more than one column at a time.
Explanation:
You wish to sort the State columns in reverse alphabetic order (explained elsewhere) and the Turnover column from highest to lowest.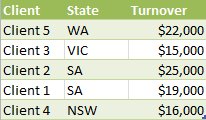
That is a Complex Sort.
Custom Sorting
Sometimes you may have a need to sort by an order other than Alphabetic or Numeric.
Explanation: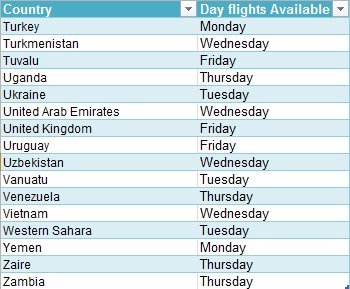
You may wish to sort in 'Dy of the Week' order. 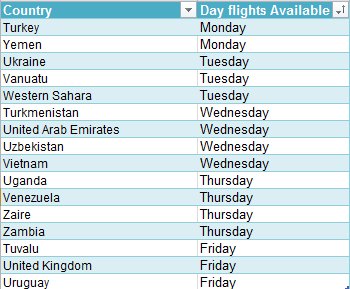
That is when you would use Custom Sorting.
Freezing
When you have a very large spreadsheet you often can not see the column heading or row labels when you move around the spreadsheet.
Explanation: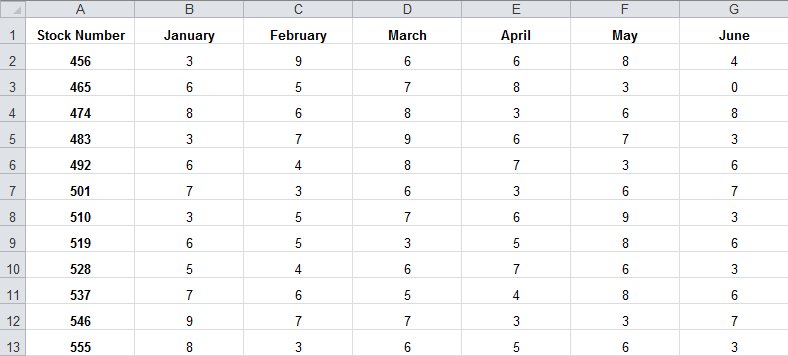
Scrolling down will show the following: (Note - you can not see the column headings) 
But when you Freeze the 'Pane' you will see the following: 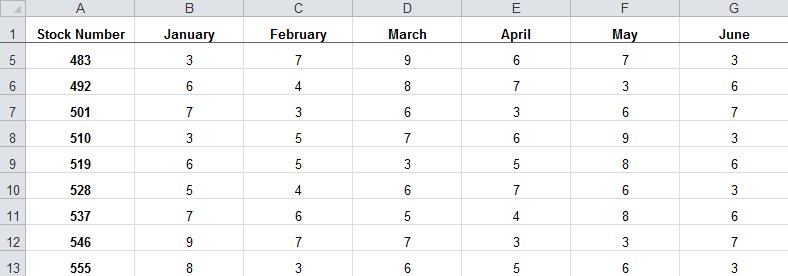
Named Ranges
Named ranges are generally used in formulas and functions (see elsewhere). However, they can be used to navigate large worksheets
Explanation:
You can 'name' a cell or a group of cells (a range) and by selecting that name from the 'name box' you can be taken immediately there. This avoids you having navigate from one worksheet to another (using the sheet tabs) and then scrolling to the desired location
3D Linking
You can link cells from one sheet to another. You can add them using formulas or the SUM Function.
Consolidating Data
It is possible that you will need to consolidate data from a series of workbooks. This can be easily achieved using Consolidating Data. You can choose to Add, Average, find the Maximum etc when you are consolidating.
Subtotals
There is a feature of Excel which allows you to create subtotals
Explanation:
Subtotals are created for each group you select. Consider the table below: 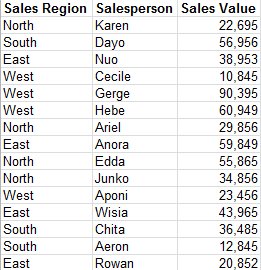
You wish to have a total for each Region
The following is an example of the correct use of 'Subtotals' 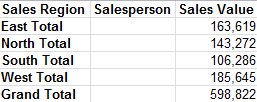
Data Validation
Often you will need to restrict what the user of your spreasdheet is able to type into the cell.
This can be easily achieved using Data Validation.
You can force them to type an Integer (a number without a decimal) or restrict them to selecting from a list of options.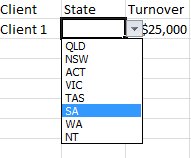
Pivot Tables
These are EASY! If you do not want to know the mechanics of Subtotals, to know about advanced functions like CountIfs and SumIfs, then Pivot Tables are for you.
Explanation:
within a minute you can create the following report:
And even a Pivot Table Chart!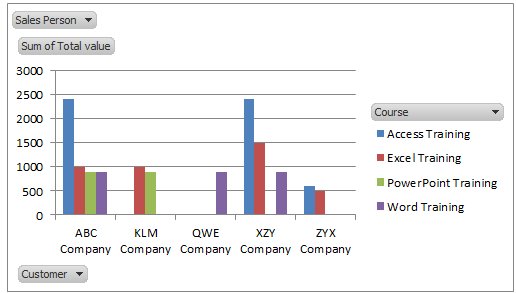
or even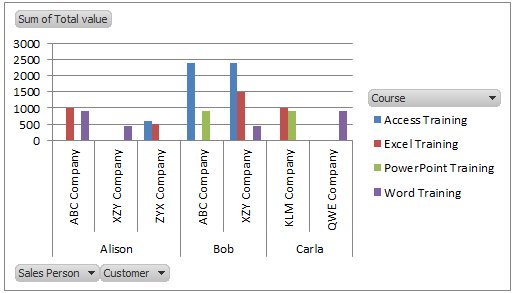
 Charts - from start to finish
2 Hours
Topics Covered:
Select a topic from the list above to read more about that Excel Chart feature.
Topics include:
- The 3 Second Chart
- Column Charts
- Bar Charts
- Line Charts
- Pie Charts
- Composite Charts
- Trend Lines
- Chart templates
- Modifying Charts
- Using Charts in Word or PowerPoint
Column Charts
Column charts are the most popular charts for displaying data.
Explanation:
This is the original data table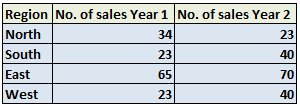
This is a Column Chart created from that table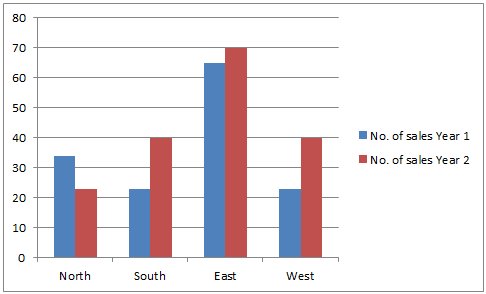
Bar Charts
Bar charts are as easy as Column charts only that they disply the data horizontally rather than vertically. They are often used when there are many fields.
Explanation:
This is the original data table
This is a Bar Chart created from that table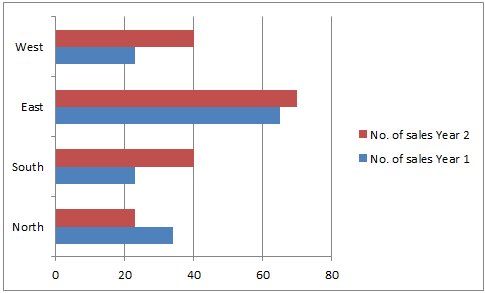
Line Charts
Line charts are another popular charts for displaying data.
Explanation:
This is the original data table
This is a Line Chart created from that table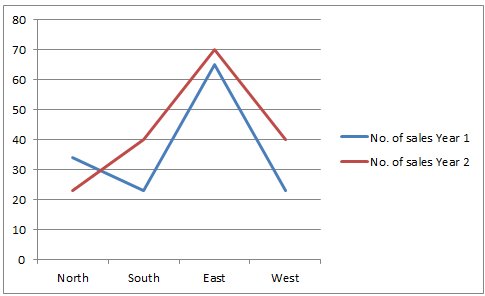
Pie Charts
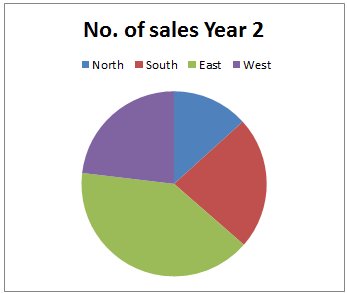
Pie charts are another popular charts for displaying data.
Explanation:
This is the original data table
These are some Pie Charts created from that table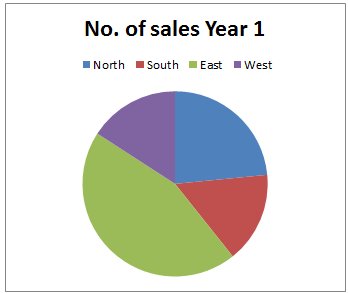
Composite Charts
Composite charts use two different chart types to display the data.
Explanation:
This is the original data table
This is a Composite Column/Line Chart created from that table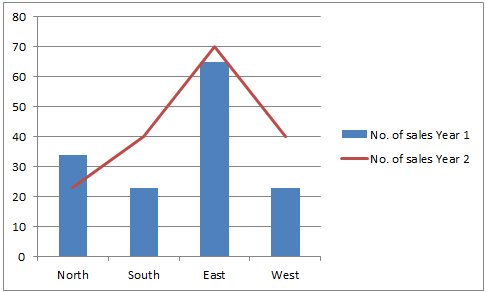
Trendlines
Trend lines are used to display the overall direction of movement of the data.
Explanation:
This is the original data table
This is a Trend Line for Year 2 created from that table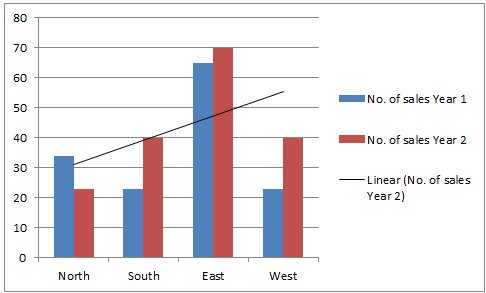
Templates
Templates are used to preserve charts which you have created which you would like to use again and again.
Explanation:
This is the original data table
This is a A user created template created from that table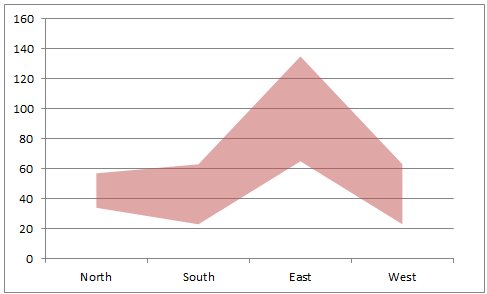
Chart Modifications
Once you have created a chart, it can be modified to suit your exact display needs.
Explanation:
This is the original data table
This is a the Original Column Chart created from that table
This is a the Modified Column Chart created from the same table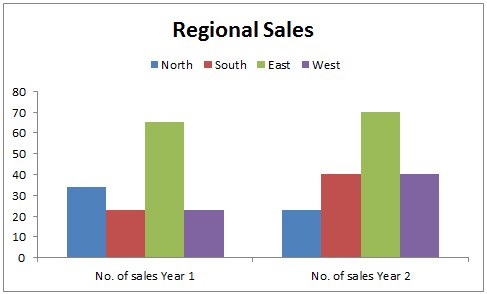
Using Charts in Word and PowerPoint
Your chart can be used (and linked) in a MS Word report or a PowerPoint presentation.
Explanation:
This is the original data table
This is a the Chart to be used created from that table
This is a the Chart in PowerPoint created from the same table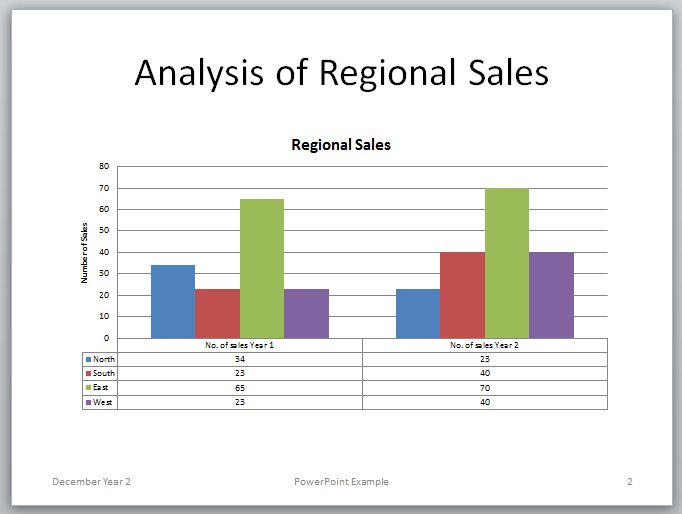
 Printing - all you ever need to know
1 Hour
Topics Covered:
Select a topic from the list above to read more about that Excel Printing feature.
Topics include:
- Print Preview
- Fitting to One Page Wide
- Paper Size
- Page Alignment
- Headers and Footers
- Freezing Top Rows
Print Preview
Use Print Preview to inspect the result of your printing before committing it to the printer.
Original Excel Worksheet: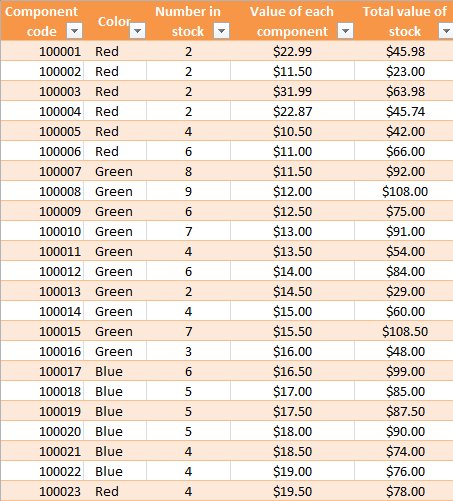
Print preview: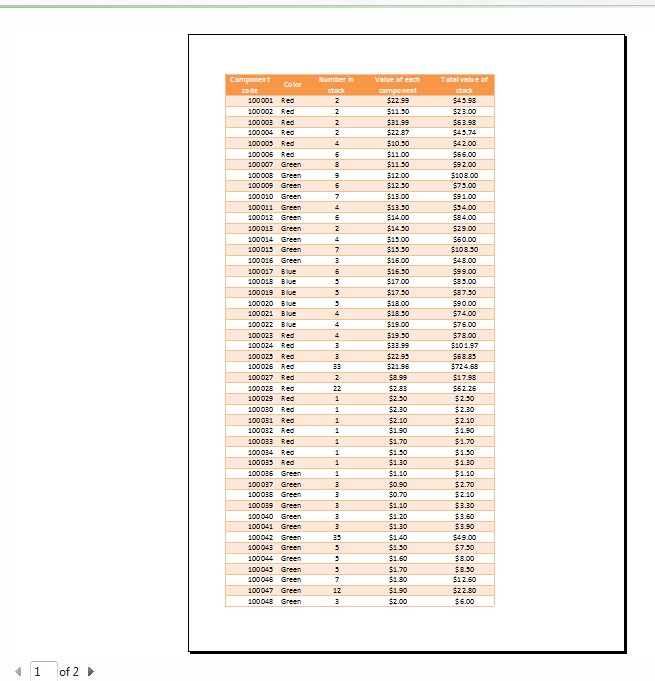
Fit to One Page Wide or/and One Page Tall
You can force Excel to print to one page (or 2 pages) wide and one or more pages tall.
Original Excel Worksheet:
Fitted to One Page: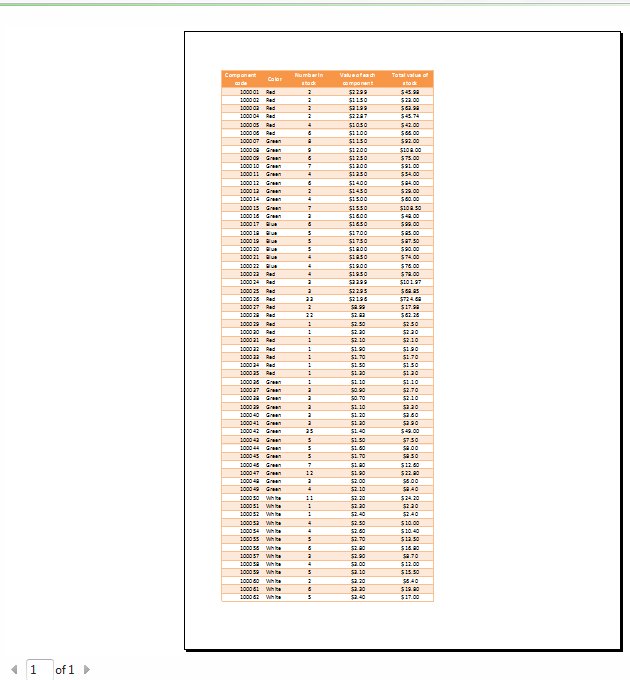
Excel can use any size of paper your printer is capable of printing on. Most popular options are A4 and A3.
Page Alignment
When printing, you can force Excel to print the result centered either or both vertically or horizontally
Original Print Preview:
Fitted to One Page: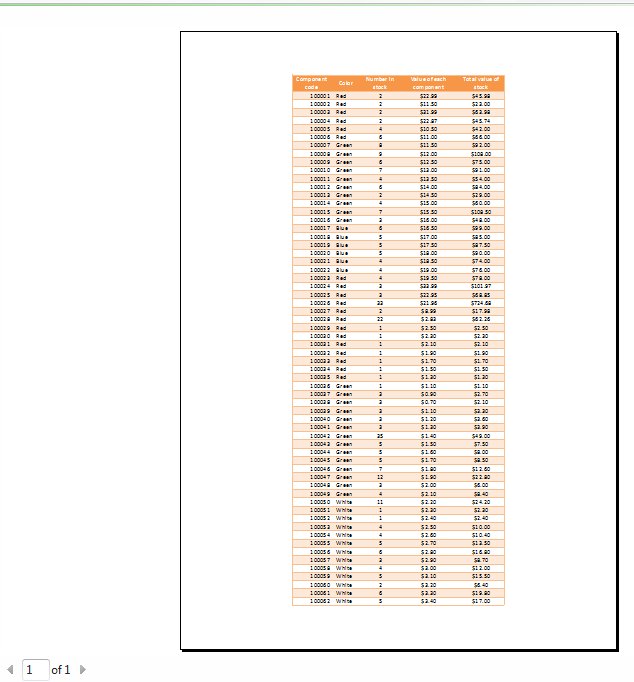
Freezing Rows at the Top of Every Page
If your original Excel worksheet contains column headings you can force Excel to place the contents of Row 1 (or Rows 1 and 2 etc) at the top of every printed page.
Original Print Preview Page 2: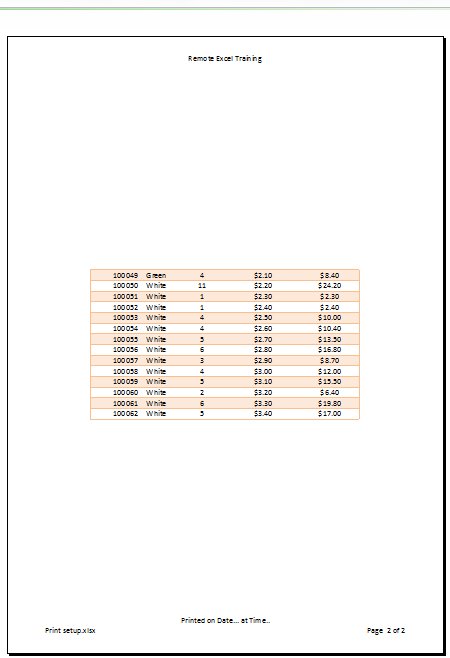
With Row 1 Frozen on Page 2: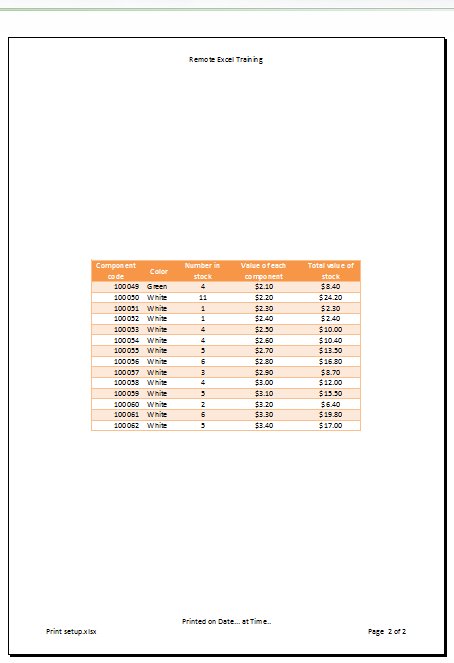
 Worksheet & Workbook Protection
1 Hour
Topics Covered:
Select a topic from the list above to read more about that Excel Protection feature.
Topics include:
- Worksheet Protection
- Workbook Protection
- Restricting Workbook Access
Worksheet Protection
Prevent users from mistakenly altering formulas.
Explanation:
Often there may be cells on a worksheet which you do not want altered e.g. formulas, functions, labels, headings, charts etc. You can limit where on the worksheet a user can enter data. This is called Worksheet Protection.
Workbook Protection
Prevent users from changing the view and other features of the workbook.
Explanation:
You may have hidden worksheets and do not wish users to unhide them. You can arrange the view of worksheets within a workbook and then protect them from being altered. This is called Workbook Protection.
Restricting Workbook Access
Prevent users from opening the workbook or modifying the workbook.
Explanation:
Confidential files, if they are not restricted by your IT department's file system (or server) access rights can be set up to be opened only by password.
Or, maybe you do not mind someone opening your workbook BUT they are not allowed to modify it without a password.
Both of these features can be controlled by Restricting Workbook Access.
 Formulas & Functions - Introduction
3 Hours
Topics Covered:
Select a topic from the list above to read more about that Excel Basic Formula or Function feature.
Topics include:
- Basic Formulas
- Relative and Absolute Cell References
- Basic Functions
Basic Formulas
Formulas are user initiated. They are used when they wish to add, subtract, multiply the contents of various cells or divide one cell by another.
Explanation: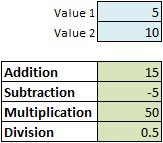
Simple operations are shown above. The course also covers the 'precedence of operations' and how to copy formulas from one location to another.
Also covered are common errors made when using formulas e.g. #REF, #VALUE, #DIV/0 and #NAME.
Absolute and Relative Cell Referencing
When creating formulas (and using functions), Excel uses two referencing systems to record your formula.
Explanation:
Relative Cell Referencing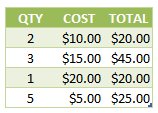
Often, Relative Cell Referencing is used where, for example, all formulas in the TOTAL column are multiplying the two previous columns as shown in the example above.
Absolute Cell Referencing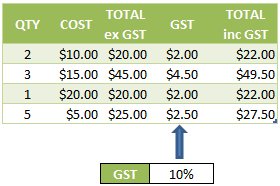
Absolute Cell Referencing is used where, for example, the contents of one simple cell e.g. GST needs to be multiplied to multiple cells e.g. COST as shown in the example above.
Basic Functions
The following basic Functions are introduced, explained and used:
- SUM - adds a range of numbers
- MAX - finds the maximum number in a range of numbers
- MIN - finds the minimum number in a range of numbers
- COUNT - counts how many 'numbers' are in a range
- COUNTA - counts all non-blank cells in a range
- IF - determines what to do based on a set of parameters
 Formulas & Functions - Advanced
3 Hours
Topics Covered:
Select a topic from the list above to read more about that Excel Advanced Formula or Function feature.
Topics include:
- Advanced Formulas
- Relative and Absolute Cell References Revised
- Advanced Functions
Advanced Formulas
Advanced formulas start to use the operators like Add, Subtract, Multiply and Divide BUT include functions to cater for errors they may create.
Explanation:
Often when setting up a worksheet, errors like #DIV/0 can appear because the formula because no values have yet been provided. These can be removed using functions.
Also, formulas requiring brackets are introduced amd more complex arrangements of formulas are explored.
Absolute and Relative Cell Referencing - Revised
When creating formulas (and using functions), Excel uses two referencing systems to record your formula.
Explanation:
Relative Cell Referencing
Often, Relative Cell Referencing is used where, for example, all formulas in the TOTAL column are multiplying the two previous columns as shown in the example above.
Absolute Cell Referencing
Absolute Cell Referencing is used where, for example, the contents of one simple cell e.g. GST needs to be multiplied to multiple cells e.g. COST as shown in the example above.
Advanced Functions
The following Advanced Functions are introduced, explained and used:
- VLOOKUP - looks up a value in a table and returns an adjacent value
- AND / OR - often used with the IF function to create 2 testing conditions
- DATE Functions - a series of useful functions for dates
- COUNTIF / COUNTIFS - counts rows only if specified criteria are met
- SUMIF / SUMIFS - adds cells only if specified criteria are met
- ERROR functions - very useful if a function returns errors like #DIV/0 or #N/A
- TEXT Functions - a series of useful functions which allow manipulation of text
- MORE functions - additional functions as required
xxx
zzz.
Explanation:
 An introduction to Macros (VBA programming)
3 Hours
Topics Covered:
Select a topic from the list above to read more about that Excel Macro feature.
Topics include:
- Why Use Macros?
- Recording Macros
- Running Macros
- Editing Macros (VBA Code)
- Variables
- Input from Users
- Decisions and Looping
- DEBUGGING Techniques
- Tips and Tricks
Why Use Macros
Macros are written in VBA code. VBA = Visual Basic for Applications. Macros assist when you have tasks which are:
- Repetitive
- Boring (often soul destroyingly tedious)
- In need of meticulous accuracy
- Very long and complicated
Well written code will mean that long, complicated or stupifyingly boring tasks are completed with the push of a button.
Recording Macros
Many simple macros can be recorded without knowing anything about VBA coding. Simply record yourself performing the actions that you want repeated.
You can the 'play' the macro time and time again and it will dutifully repeat the actions you recorded. Attach it to a button or assign a keyboard shortcut for ease of use.
Running Macros
Macros can be run in a variety of ways. If you have named the macro well, you can select it from the list of macros and run it.
If you assigned a keyboard shortcut, you can use that shortcut to activate the macro.
You may have created an icon in the Quick Access Toolbar which means it is available any time that you have Excel open.
Alternatively, you may have attached it to a button and can click the button to activate the macro code.
Editing Macros
Once you have recorded a macro, you can edit it in the VBA Editor.
With practice, you will be able to read the code and make minor changes to it so that it does excactly what you want.
It can take some time to become proficient at editing macros and understanding but it is not all that hard with some easy to understand tips.
You might even record yourself performing other tasks which when combined with your original macro, make it more useful. Often, you can simply record yourself mulitple times completing the various steps of the task you wish to automate and then arranged the code in a sequence which then runs as a complete unit.
Variables
You probably remember variables from high school algebra. VBA variables are far simpler than that.
Variables are used to store values (text, numbers, dates - anything) for use later on in the code. VBA remembers these variables and so can be used repeatedly if needed.
Input From Users
VBA code allows you to ask the user questions. The answer to these questions are stored in variables (see elsewhere for a description of these).
The input could be something simple like the user's name or it could be the name of a workbook which you need to access. The input could also be the number of lines the user wishes to insert or a start date. In fact, you can get almost any type of data from a user and then use that in the code.
Decisions and Looping
Recording code can only assist you so far. At some point you may need to set up some decisions for the code to make. If the result of that decision is True then the code will act in one way and if it is False, then it will act in another. These decisions are handled by If/Then/Else code structures. Another type of simple structure is Do While/Loop. That is, do 'something' while this condition is True and keep looping around until it is.
Sometimes you need to repeat an action. Controls such as For/Next allow you to specify a specific number of times for an action or a series of actions to be taken.
Debugging The Code
From time to time when writing code, it may not act as you expected. The code may simply stop with an error message or it may comeplete BUT with unexpected results.
Debugging allows you to control the speed of the execution of the code so that you can examine each line of code as it is executed. During this time the values in variables can be displayed and you can visually track what path the code takes through decision makling structures such as If/Then/Else.
The VBA editor has a range of debugging tools at your disposal.
Tips And Tricks
During the training the trainer will share many tips and tricks learnt over years of programming in VBA.
This could include how to look up answers in the inbuilt help system or to get answers on the internet.
The tips and tricks provided, when used in conjunction with recording or coding a macro, will assist you in speeding up your coding or to reduce common errors.
 Formatting - including Conditional Formatting
3 Hours
Topics Covered:
Select a topic from the list above to read more about that Excel Formatting feature.
Topics include:
- Basic Formatting
- Number and Date Formatting
- Format Paintbrush
- Conditional Formatting
- Table Formatting
Basic Formatting
All aspects of formatting cells are covered including:
- Fonts - size and typography
- Cells - background and foreground
- Borders
Explanation:
From your original text entries, the way in which the user views the data is explored and modified. Whilst the actual values held by Excel do not change, the way people see them does. This is called Basic Formatting.
Number & Date Formatting
Numbers and dates can be formatted in many ways including
- How to display positive and negative numbers
- What date format e.g. 1/1/17 or Sunday, 1 Jan 2017
- The inclusion of 'literals' e.g. 10 m (10 metres)
Explanation:
What the user of your spreadsheets sees can be vastly different from what is entered. You may enter 1/1/17 but Sunday, 1 Jan 2017 is what the user sees. This is called Number & Date Formatting.
Format Painting
Format painting allows you to take the format of cells which have the correct format and 'paint' that format onto cells which have a different format.
This saves you a LOT of time especially of you have inherited a spreadsheet from elsewhere and do not know the colours, fonts, size, borders etc that the original cells used.
Conditional Formatting
This is one of the most powerful formatting features of Excel. It allows you to set 'triggers' which automatically change the underlying format of cells.
Explanation:
This can be used for comapring 'Budgetted Expenses' against 'Actual Expenses'. If the actual expense is higher than the budgetted, the actual expense could be turned RED (or any combination of colours you choose).
This also is especially useful in highlighting dates. For example, you may be in charge of equipment (which needs to be inspected regularly) or in charge of the staffs' certificate registry (which needs to ensure that staff always have a current certificate). Excel's conditional formatting can be set to show if a certificate has expired or is coming up to be renewed in the next week, fortnight or month etc.
There are FAR more features to Conditional Formatting which will make your data become visually 'alive'.
Table Formatting
One of the most useful features of Excel is the way in which it can automatically format tables. This feature is so good that it will almost eliminate the need for you to learn formulas and functions, filtering and subtotals.
This features is so powerful, it should be used for all spreadsheets which are displayed as a table (that is, the table has headings and the data beneath the column headings is discrete - for example in a column labled Post Codes, you do not have 'SA' or 'NSW' - just Post Codes ). Once you know how to use this feature, never again will you need to try to make your tables look good - they just will...
Day Long Courses (and save!)
You can create your own day long courses by selecting any of the above courses to add up to 6 hours. By doing this, you can SAVE 10% on the normal course fees. Of course, breaks will not be included in the 6 hours. Breaks will occur after 90 minutes in the 3 hour short courses. And you can negotiate a lunch break of 30 - 60 minutes half way through the 6 hours if the same person/crew is undertaking the full day's training.
However, you may also have different people attending different sessions during the day, if that is desired. Therefore, the lunch break would not need to be so long. We are VERY flexible and will endeavour to suit your training needs.
Examples of day long course combinations:
- Data Management AND either Basic Formulas OR Advanced Formulas - (6 hours)
- Intro to Macros (VBA) AND Advanced Formulas - (6 hours)
- Basic Formulas AND Advanced Formulas - (6 hours)
- Charts AND Printing AND any one of Data Management, Basic Formulas OR Advanced Formulas - (6 hours)
- YOUR choice - (6 hours)
Your selection can combine:
- Data Management (3 hours)
- Charts - from start to finish (2 hours)
- Printing - all you ever need to know (1 hour)
- Worksheet & Workbook Protection (1 hour)
- Formulas & Functions - Introduction (3 hours)
- Formulas & Functions - Advanced (3 hours)
- An introduction to Macros (VBA programming) (3 hours)
- Formatting - including Conditional Formatting (3 hours)


